Unit 4 Desmos Drawing And Function Families
|
Q1: How did you go about drawing this image?
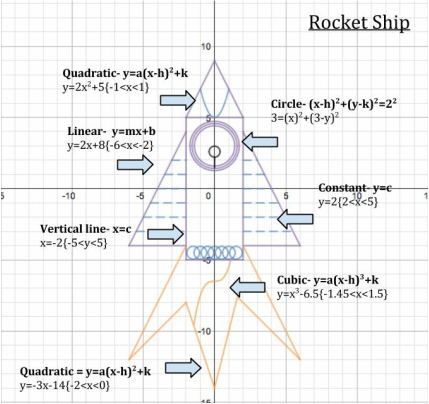
To begin my drawing I first needed to know my the different equations needed to create the shapes which would create my final picture. At first I didn't know what I wanted to create with this program or what wouldn't be achievable for me. To start off I made a rectangle and realized soon after that I would be able to meet each criteria and equations needed with drawing a rocket ship. While making this I ran into some trouble of learning how to restrict the line. I asked my peers and teacher to help me solve this problem. Once I knew how to do so I didn't have many troubles from that point on. To create this drawing I used over 40 lines including the circles, it took 1-3 class periods to complete the equations which made up this drawing. Q2: How did using Desmos and creating this drawing help you understand function families and their transformations? Desmos helped me understand function families through the visual component of the program. I could plug in an equation and see how it was created on a graph. This helped me realize that the given equations leaded to creating a line, which I never understood how that worked. I think this will help me in the future because I've comprehended that equations can create a line or a circle they are not just there for us to solve. |
Unit 3 Reflection
3D shapes, area, surface area, and volume
Q1: What content/skills have been most interesting to you?
I think it is very interesting that to find the volume of a 3D object that you have to find the area of the and then the height.
Q2: How have you grown mathematically?
This has helped me because we broke it down to the point where it was easy to understand.
I think it is very interesting that to find the volume of a 3D object that you have to find the area of the and then the height.
Q2: How have you grown mathematically?
This has helped me because we broke it down to the point where it was easy to understand.
Unit 2 Reflection
shadows, similarity, and right triangle trigonometry
Q1: What has been the work you are most proud of in this unit?
I am most proud of from unit 2 is learning and demonstrating the trig ratio equations. I am most proud of this work because I have learned how to apply them to real world scenarios as well as I can continue to use it throughout the following units and information taught to me in math. I can use this in the real world by finding triangles through out places and using the given equations to find the missing length you don't know. For example if I stand 20 feet away from a lamp post and find the angle from me to the top of the lamp post, I can find the height of the lamp post using one of the three a trig equations.
Q2: What skills are you developing in geometry/math?
Skills I have that are developing in geometry and math for me are SINE, COSINE, and TANGENT. These are still developing because it was and has been vague to me what given ratio to use for the specific sides provided, along with plugging that ratio into the calculator to find the answer.
Q3: Choose one topic: similarity (ratios) or trigonometry. Explain what it is. Provide an example of how it is used in mathematics to solve problems. State an application of the topic in the adult world that interests you.
As an example of one of these three trig ratio equations, SIN.
The equation for SIN is: SIN(A)=opposite/hypotenuse.
You use the angle of the triangle and plug that into A.
For example, 50 degrees. SIN(50)=opposite/hypotenuse.
Next, you find the opposite side's length and the hypotenuse, which in this case the opposite side is X and the hypotenuse is 16cm.
SIN(50)= X/16. To find the missing side you need to isolate X and you do so by using basic of algebra.
16*SIN(50)=X
X=12.25
Tessellation Project
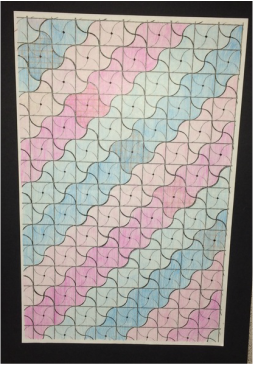
What is the idea/theme behind your idea?
The idea behind our tessellation is a flower theme. We added outer dimensions so that we could copy the tile and fit them together. We wanted our page covered in the tile in a way that would look almost as if it were a pattern in the flower's colors. With multiple different shapes and elements to make it look complex and extravagant.
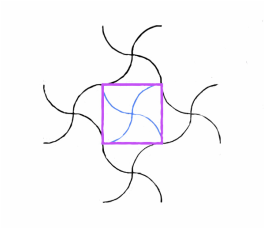
What polygons did you start with and how did you alter it?
We started with a square in the beginning. We decided to alter the outer dimensions of the square to add a puzzle effect. We constructed a S shape on each outer corner of the square. The original S line we constructed was just reflected on each outer corner of the square.
What transformations describe how your pre-image tile moved to create your two image tiles?
Our pre-image tile was just copied and then connected together to create a blanket of our tiles. The tile moved to form a whole new shape since the shapes were made to connect perfectly together.
In your opinion are tessellations math or art?
Tessellations have many real-world examples and are a physical link between math and art. There are two sides to a tessellation. You start with a polygon which would be considered a math element, however, ‘shape’ is an art element as well. We can go either way. If we desire a more artistic tessellation we can create that. If we want a more structured tessellation we can use more of a math view.
As a student with a more logical view on academics I can view tessellations on more of the math side due to the elements included in tesselations. Such as reflections, angles, lines, and shapes. When all the ‘math’ aspects are finally connected and form fitted together it slowly evolves into art when you add personal touches such as color, pattern and value.
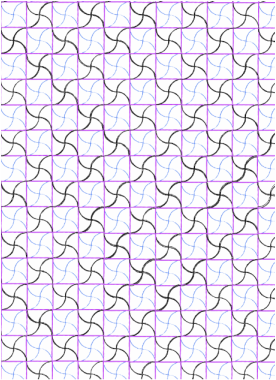
Tile Construction Instructions
Tessellation Construction Instructions
The idea behind our tessellation is a flower theme. We added outer dimensions so that we could copy the tile and fit them together. We wanted our page covered in the tile in a way that would look almost as if it were a pattern in the flower's colors. With multiple different shapes and elements to make it look complex and extravagant.
What polygons did you start with and how did you alter it?
We started with a square in the beginning. We decided to alter the outer dimensions of the square to add a puzzle effect. We constructed a S shape on each outer corner of the square. The original S line we constructed was just reflected on each outer corner of the square.
What transformations describe how your pre-image tile moved to create your two image tiles?
Our pre-image tile was just copied and then connected together to create a blanket of our tiles. The tile moved to form a whole new shape since the shapes were made to connect perfectly together.
In your opinion are tessellations math or art?
Tessellations have many real-world examples and are a physical link between math and art. There are two sides to a tessellation. You start with a polygon which would be considered a math element, however, ‘shape’ is an art element as well. We can go either way. If we desire a more artistic tessellation we can create that. If we want a more structured tessellation we can use more of a math view.
As a student with a more logical view on academics I can view tessellations on more of the math side due to the elements included in tesselations. Such as reflections, angles, lines, and shapes. When all the ‘math’ aspects are finally connected and form fitted together it slowly evolves into art when you add personal touches such as color, pattern and value.
Tile Construction Instructions
- We created a 8 by 11 inch photoshop file
- We formed a square
- We drew an S shape line and then reflected it on each corner of the original square..
- We used the same line shape, just minimized, in the middle of the square.
Tessellation Construction Instructions
- We selected the tile made in photoshop and copied it (command C)
- On a new photoshop file we pasted the tile over and over while also renaming every layer.
- with every new pasted tile we connected them together making a whole page of connected tile pieces.
GGB Lab: The Burning Tent
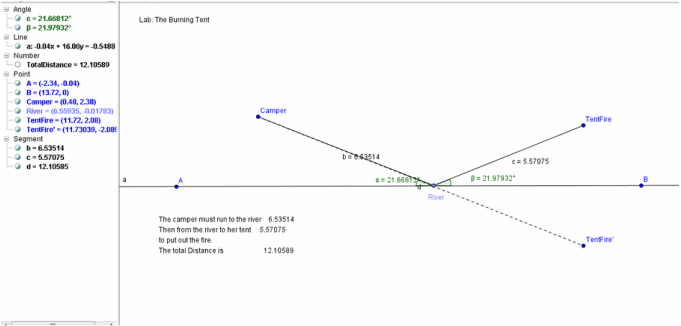
The incoming and outgoing angle are on the same length an on the same line.
The path from the point Camper to the point Tent Fire are the shortest because the point of the GGB Lab was to find the shortest path from between those two points. As well as the line made up by the two points River and Camper is a reflection of the line made by the two points River to the Tent Fire.
The point River should be either on the dotted line or in the middle of the two points Camper and Tent Fire to minimize the distance between.
GGB Lab: Snail Trail
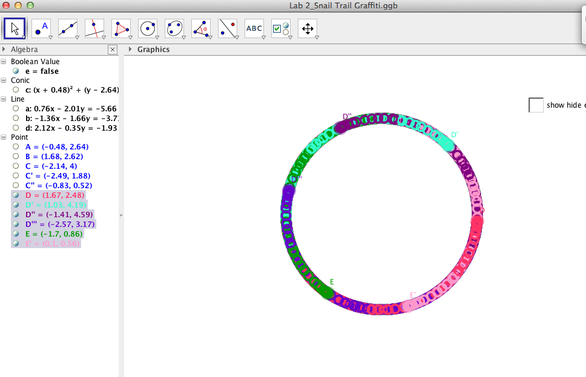
How did you construct the “snails” and the reflective plane? What did you notice about the “snails” and their graffiti trails? What type of symmetry does your design exhibit if you ignore the color? Be specific, use the vocabulary you’ve learned: reflectional, rotational, order of rotation, angle of rotation, hexagon, line of reflection, etc.
I constructed these “snails” by following the steps on the handout worksheet that Caitlyn gave us. What I noticed about the “snails” is that they stayed on the line. They didn’t go on any other “path” besides the path of the circle. This circle has reflectional symmetry, It has reflectional symmetry because from any point on the circle you can fold it in half and it will show the same image on the other side.
I constructed these “snails” by following the steps on the handout worksheet that Caitlyn gave us. What I noticed about the “snails” is that they stayed on the line. They didn’t go on any other “path” besides the path of the circle. This circle has reflectional symmetry, It has reflectional symmetry because from any point on the circle you can fold it in half and it will show the same image on the other side.
